Showing posts with label fmq. Show all posts

Saturday, 19 July 2014

Labour of Love - A Finished Quilt

A couple of weeks ago I shared my experience with you when I visited the Carltonville Country Counters' Regional meeting, and how I volunteered to quilt this quilt for them, you can read all about it here.  


Well the time has finally arrived to share the finished quilt with all of you.  

After they sent it to me I had it 'sit' for a few weeks until I finally decided what I wanted to quilt.  I really wanted the quilting to pop and to emphasize the quilt design.  So I used my all time favourite quilting designs, alternating between swirls, pebbles and some dot to dot quilting with a wiggly filler.  
I will let the pictures tell the rest of the story.... 


I enjoyed every second I spent finishing this quilt for them.  It was a totally new experience quilting a quilt not pieced by myself, the fabrics used in this quilt is truly beautiful, I love the rich colours.

I am really proud of what I have done and I hope they approve and will call on me again in the future for projects like these... it was honestly 'A Labour of Love'.


* My posts delivered to you *

 photo rss_zps514fcff1.png    photo bloglovin_zpsb177e45f.png    photo mail_zps60f67007.png


Thursday, 5 June 2014

Double Slice Progress

So, a couple of week, or maybe more, I decided to finish my Double Slice Layer Quilt, quilting it with a simple flower meander design.  So far I think it looks really great!


But quilting it, the same design over and over, over such a large space is BORING!!  Don't get me wrong, I LOVE to free motion quilt, its my most favourite part of making a quilt, I don't know how any of you feel when quilting the same design over an entire quilt, but it really is not exciting!  One plus I can really think of, is that is goes fast.


I really love the texture this design gives, it blends in so well into the background.  I only have the white and outer border to quilt, but have not decided yet what I want to quilt in those spaces yet.


Hopefully I will have a finished quilt to share with all of you soon!


* My posts delivered to you *

 photo rss_zps514fcff1.png    photo bloglovin_zpsb177e45f.png    photo mail_zps60f67007.png


Wednesday, 29 January 2014

The Quilting has Begun

When I started piecing this quilt, I knew I was up for a challenge.  I knew it would be quite big, and I knew the day would come where I had to draw every bit of energy and courage to start quilting it.  My biggest concern was knowing I had to get this quilt into that small throat space of my little Bernina, which by the way is only 7½ inches (19cm) from the needle right up to the edge.

So as I was waiting for the backing fabric to arrive I literally prepared myself mentally for the challenge ahead.  I knew it had to be possible, I just needed to convince myself to take is easy, take it slow and to not rush it.  I had to have a plan, its pointless rushing into it, without knowing what free motion quilting designs I wanted on this quilt.  


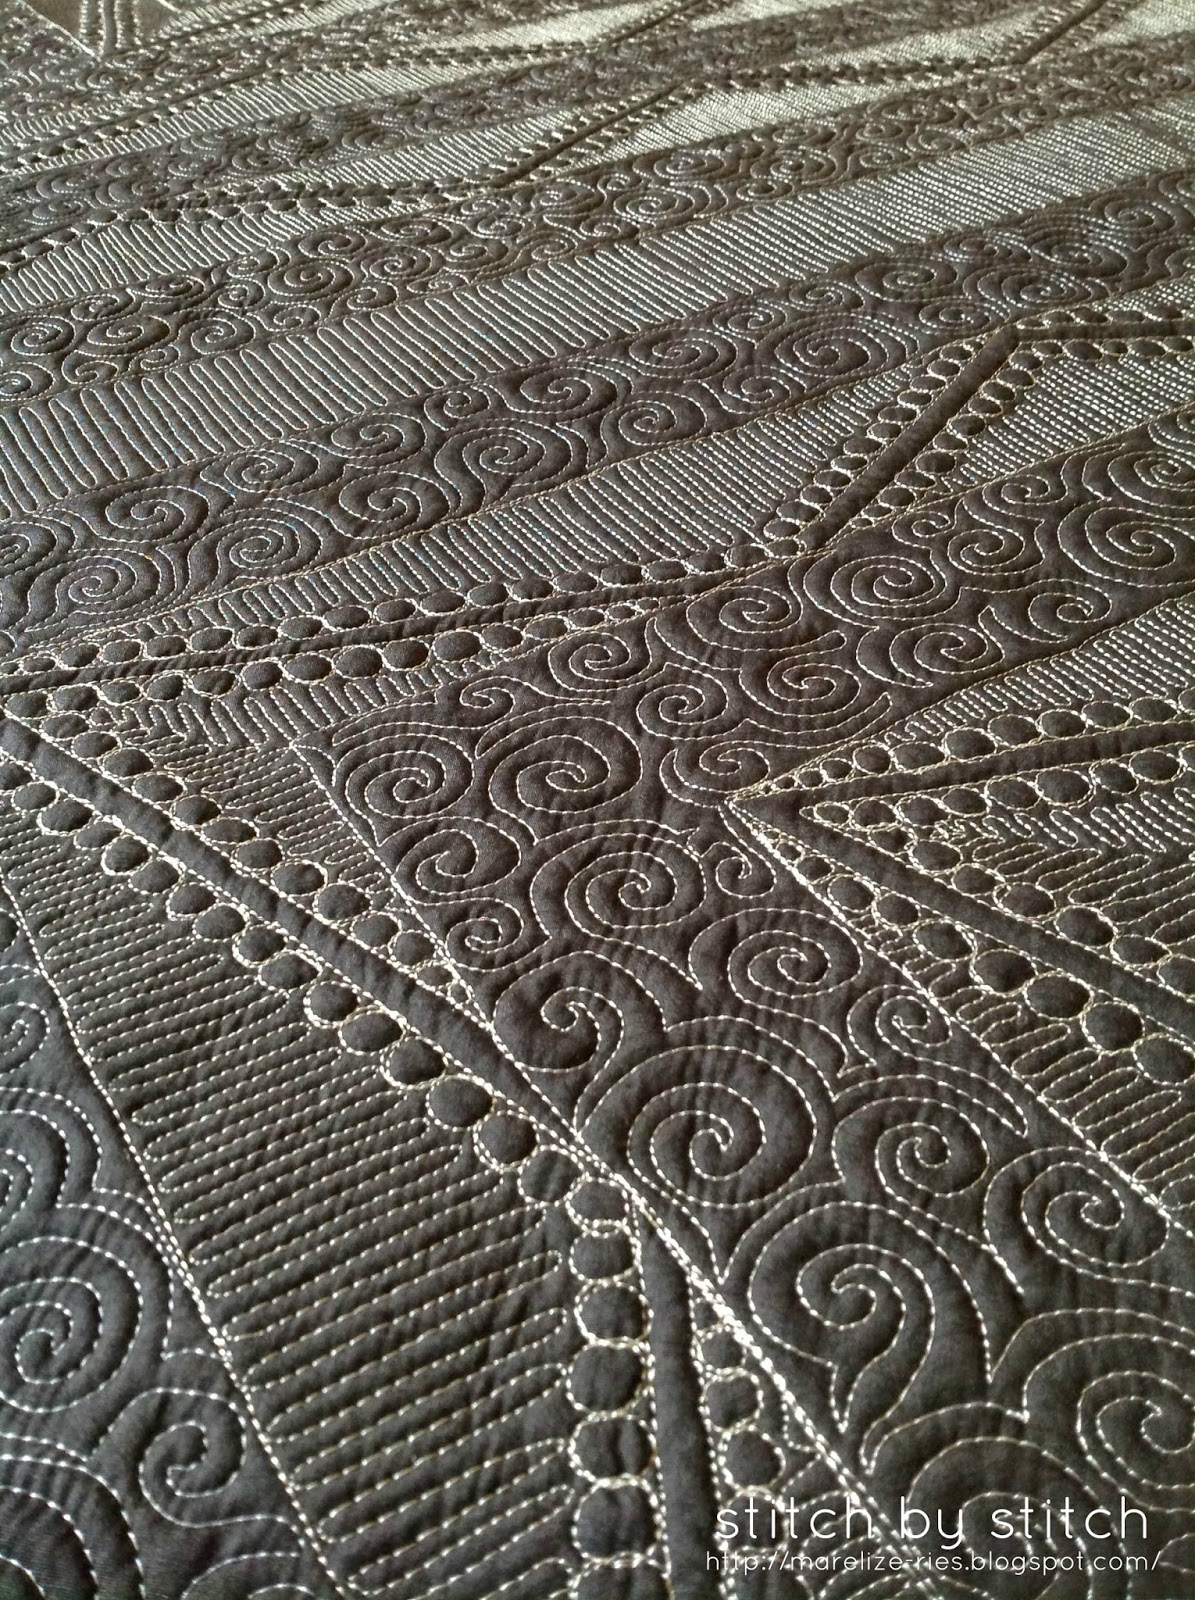
I knew that I wanted to quilt designs that I was familiar with, had experience quilting and that was not going to drive me up the wall giving the fact that I have very little space to work with.  So I went with swirls and pebbles,  quilting designs I knew I was comfortable with, knew how to quilt and because I wanted to draw attention to the secondary designs of the blocks themselves.  I knew they would work, especially inside the white background.  The only thing I'm now a bit unsure of, and second guessing myself, is the swirls I quilted inside the border of each block.  Now that I am stepping back, looking at the overall picture, it does not really separate itself from the block, something I was aiming for.  


But I am halfway, and to rip out those stitches would be madness.  So I am going to carry on and hope that once I am finished it will all come together.

Together with all the swirls and pebbles I've quilted straight lines and some diamond variations I learnt from taking the Dot to Dot Craftsy class.  It sets of beautifully in the background and really makes the swirls and pebbles pop.  


I am no expert but if ever you have a large quilt to quilt on your home sewing machine, here are a few tips I know is helping me so far;

-  Take it slow, try to relax and constantly move and adjust the quilt to have the least amount of fabric inside the throat space of your sewing machine.  
-  Practice quilting designs going in different directions.  Quilting straight lines is NOT always possible stitching it forwards or backwards.  Learning to stitch from left to right and right to left is essential.
-  Don't overdo it, take a lot of breaks between quilting.  You wont tense up and you'll be a lot more focused with a clear mind.
-  One point I still have to work on myself; is to not look too closely at uneven stitches, when stepping back admiring your work, you'll see the final picture and NOT silly mistakes.
-  Listen to your favorite radio station or music.  
-  Finally, DO NOT quilt if you are not in the mood to at that moment.  Your quilt will get finished...

Oh, I have to just share this with you before you go, my husband is very supportive, always keep track of my progress and he really tries to comment or encourage me, and just yesterday he said:  "I like the soap bubbles you added between the swirls"... awe, so sweet!!

Thanks for stopping by!


* My posts delivered to you *

 photo rss_zps514fcff1.png    photo bloglovin_zpsb177e45f.png    photo mail_zps60f67007.png


Friday, 17 January 2014

Quilted Sewing Machine Cover

I have been meaning to make a sewing machine cover for my little Bernina for ages now.  I had one that I made soon after I got my machine, but let me be honest, I had NO idea what I was doing.  The measurements where off, it was wonky and it was just not 'pretty'.  After my husband made a drop in table top for my sewing machine soon after it did not longer fit snug over my machine anyway.  Sure it served its purpose, but I really wanted something that not only protects my machine from dust, but it really had to look pretty too.  


Aren't the spool blocks cute?!  I recently started saving all the selvage edges of fabric I have been using for exactly something like this.  There are so many projects that I've seen where they are being used and I just knew I wanted to make something with them.  This was the perfect little project for them!

Shared on Instagram - @marelizeries


...and just for fun I made a cute pincushion using an old tuna tin, and a thread catcher to go with it.


* My posts delivered to you *

 photo rss_zps514fcff1.png    photo bloglovin_zpsb177e45f.png    photo mail_zps60f67007.png


Monday, 9 December 2013

Asymmetrical Half Square Triangle Quilt - A FINISH


I am so glad I decided to finish this quilt.  If you remember a while back, I shared a POST with you where I was quite discouraged about the quilting and how I just felt it did not have the look I was hoping for.  Well, you where all right, and I have to thank each and everyone of you encouraging me to finish this quilt.  Now that is blocked, bound and hung it looks good.  Not perfect, but a lot prettier and I love the finished result.


As I was finishing up this quilt I got more and more excited to getting it done.  All I needed was a break from it, having it lie in plain sight each day, looking at it, almost 'staring' back at me.  And the more I really looked at it, I started seeing the potential rather than the flaws.


The pictures does not show it that clearly, but I love the texture and how the light falls on the directional quilting , it adds a shine all over the surface of the quilt.  If you stood at different places, looking from other angles it looks different each time.


It is especially visible from the back of the quilt.


If you'd like to read up on the design process of this quilt you find it HERE.  I am at the moment working on a pattern for this quilt, playing with different colour layouts.  I treated myself with a very early Christmas present and bought the EQ7 program and are very eager to share it with all of you.  

It is pieced and quilted on my home sewing machine.  The finished size is 36½ inches x 45½ inches.  

* My posts delivered to you *

 photo rss_zps514fcff1.png    photo bloglovin_zpsb177e45f.png    photo mail_zps60f67007.png


LinkWithin

Related Posts Plugin for WordPress, Blogger...